Monitoring with Metrics
Metrics is a minimal library for various server monitoring metrics, and easy reporting. Supported metrics include rate meters; instant gauges; counters; histograms; timers. Furthermore, various reporting formatting is included. See their Getting started page for more details.
It’s available on Maven Central, so the following Gradle config will include the latest 3.1.0 version.
repositories {
  mavenCentral()
}

dependencies {
  compile 'io.dropwizard.metrics:metrics-core:3.1.0'
}
The simplified tests in the code below will output this report.
2/9/17 8:10:50 PM =============================================================

-- Histograms ------------------------------------------------------------------
histogram
             count = 4
               min = 1
               max = 3
              mean = 2.50
            stddev = 0.87
            median = 3.00
              75% <= 3.00
              95% <= 3.00
              98% <= 3.00
              99% <= 3.00
            99.9% <= 3.00


2/9/17 8:10:50 PM =============================================================

-- Gauges ----------------------------------------------------------------------
gauge
             value = 123


2/9/17 8:10:50 PM =============================================================

-- Meters ----------------------------------------------------------------------
meter
             count = 2
         mean rate = 19.68 events/second
     1-minute rate = 0.00 events/second
     5-minute rate = 0.00 events/second
    15-minute rate = 0.00 events/second


2/9/17 8:10:50 PM =============================================================

-- Timers ----------------------------------------------------------------------
timer
             count = 1
         mean rate = 4.95 calls/second
     1-minute rate = 0.00 calls/second
     5-minute rate = 0.00 calls/second
    15-minute rate = 0.00 calls/second
               min = 200.13 milliseconds
               max = 200.13 milliseconds
              mean = 200.13 milliseconds
            stddev = 0.00 milliseconds
            median = 200.13 milliseconds
              75% <= 200.13 milliseconds
              95% <= 200.13 milliseconds
              98% <= 200.13 milliseconds
              99% <= 200.13 milliseconds
            99.9% <= 200.13 milliseconds


2/9/17 8:10:50 PM =============================================================

-- Counters --------------------------------------------------------------------
counter
             count = 6
Some metrics examples:
/* Copyright rememberjava.com. Licensed under GPL 3. See http://rememberjava.com/license */
package com.rememberjava.performance;

import org.junit.After;
import org.junit.Before;
import org.junit.Test;

import com.codahale.metrics.ConsoleReporter;
import com.codahale.metrics.Counter;
import com.codahale.metrics.Gauge;
import com.codahale.metrics.Histogram;
import com.codahale.metrics.Meter;
import com.codahale.metrics.MetricRegistry;
import com.codahale.metrics.Timer;
import com.codahale.metrics.Timer.Context;

public class MetricsApiTest {

  private MetricRegistry metrics;

  @Before
  public void setup() {
    metrics = new MetricRegistry();
  }

  @After
  public void report() {
    ConsoleReporter reporter = ConsoleReporter.forRegistry(metrics).build();
    reporter.report();
  }

  @Test
  public void testMeter() throws InterruptedException {
    Meter meter = metrics.meter("meter");
    meter.mark();
    Thread.sleep(100);
    meter.mark();
  }

  @Test
  public void testGauge() {
    Gauge<Integer> g = (() -> 123);
    metrics.register("gauge", g);
  }

  @Test
  public void testCounter() {
    Counter counter = metrics.counter("counter");
    counter.inc();
    counter.inc(5);
  }

  @Test
  public void testHistogram() {
    Histogram histogram = metrics.histogram("histogram");
    histogram.update(1);
    histogram.update(3);
    histogram.update(3);
    histogram.update(3);
  }

  @Test
  public void testTimer() throws InterruptedException {
    Timer timer = metrics.timer("timer");
    Context time = timer.time();
    Thread.sleep(200);
    time.stop();
  }
}
Identity Map Collector Helpers
When generating a Map, the basis is very often a list of unique elements (i.e. a Set), and often the original elements take part in the new Map, either as keys or values. When the original elements are keys, we might be talking about a cache, where the key is the pointer and the value is the result of some expensive operation. E.g. the key is a filename and the value is the bytes of the file loaded into memory for fast serving. Conversely, when the original elements are values of the new map, we’re often dealing with a look-up table, e.g. from an ID to its User object, or as in the previous article from a short-form string to a specific class reference.
Streams iterating over collections, and lambda functions take some of the dull boilerplate out of creating these kind of maps. However, some of the helper classes, like Collectors, come with rather long method names. To take away even these parts, here are a few helper methods for the identity maps. They come in two forms: One which returns a Collector which can be used in the collect() method of the Stream. Typically, this is useful if other operations, like filtering, is also used. The other helper methods operate directly on the Collection, and take only the mapping function for keys or values. See the full file for further examples and documentation below.
  public static <T, U> Collector<T, ?, Map<T, U>> identityToValue(
      Function<? super T, ? extends U> valueMapper) {
    return Collectors.toMap(Function.identity(), valueMapper);
  }

  public static <T, U> Map<T, U> identityToValue(
      Collection<T> c, Function<? super T, ? extends U> valueMapper) {
      return c.stream().collect(identityToValue(valueMapper));
  }
public static <T, K> Collector<T, ?, Map<K, T>> keytoIdentity(
Function<? super T, ? extends K> keyMapper) {
return Collectors.toMap(keyMapper, Function.identity());
}
public static <T, K> Map<K, T> keytoIdentity(
Collection<T> c, Function<? super T, ? extends K> keyMapper) {
return c.stream().collect(keytoIdentity(keyMapper));
}The full code listing, with examples and documentation. This code is under GPL3.
/* Copyright rememberjava.com. Licensed under GPL 3. See http://rememberjava.com/license */
package com.rememberjava.lambda;

import static org.junit.Assert.assertEquals;

import java.util.ArrayList;
import java.util.Arrays;
import java.util.Collection;
import java.util.List;
import java.util.Map;
import java.util.function.Function;
import java.util.stream.Collector;
import java.util.stream.Collectors;

import org.junit.Test;

public class IdentityCollectorsTest {

  /**
   * Returns a specialised {@link Collector} which results in a {@link Map}
   * where the keys are the elements of the stream, and the values is provided
   * by the given mapping function.
   *
   * @param <T> the type of the input elements, and keys of the Map
   * @param <U> the output type of the value mapping function
   *
   * @param valueMapper a mapping function to produce values
   * @return a {@code Collector} which collects elements into a {@code Map}
   *         whose keys are as given by the stream, and values are the result of
   *         applying the given mapping function to the input elements.
   */
  public static <T, U> Collector<T, ?, Map<T, U>> identityToValue(
      Function<? super T, ? extends U> valueMapper) {
    return Collectors.toMap(Function.identity(), valueMapper);
  }

  /**
   * Returns a {@link Map} based on the given {@link Collection}. The keys are
   * the elements of the Collection, and the values is provided by the given
   * mapping function.
   *
   * @param <T> the type of the input elements, and keys of the Map
   * @param <U> the output type of the value mapping function
   *
   * @param c Collection of elements to map
   * @param valueMapper a mapping function to produce values
   * @return a {@code Map} whose keys are as given by the Collection, and values
   *         are the result of applying the given mapping function to the input
   *         elements.
   */
  public static <T, U> Map<T, U> identityToValue(
      Collection<T> c, Function<? super T, ? extends U> valueMapper) {
      return c.stream().collect(identityToValue(valueMapper));
  }

  /**
   * Returns a specialised {@link Collector} which results in a {@link Map}
   * where the keys are provided by the given mapping function, and the values
   * are the elements of the stream.
   *
   * @param <T> the type of the input elements, and values of the Map
   * @param <K> the output type of the key mapping function
   *
   * @param keyMapper a mapping function to produce keys
   * @return a {@code Collector} which collects elements into a {@code Map}
   *         whose keys are the result of applying the given mapping function
   *         to the input elements, and values are as given by the stream.
   */
  public static <T, K> Collector<T, ?, Map<K, T>> keytoIdentity(
      Function<? super T, ? extends K> keyMapper) {
    return Collectors.toMap(keyMapper, Function.identity());
  }

  /**
   * Returns a {@link Map} based on the given {@link Collection}. The keys are
   * provided by the given mapping function, and the values are the elements of
   * the Collection.
   *
   * @param <T> the type of the input elements, and values of the Map
   * @param <K> the output type of the key mapping function
   *
   * @param c Collection of elements to map
   * @param valueMapper a mapping function to produce values
   * @return a {@code Map} whose keys are the result of applying the given
   *         mapping function to the input elements, and values are as given
   *         by the stream.
   */
  public static <T, K> Map<K, T> keytoIdentity(
      Collection<T> c, Function<? super T, ? extends K> keyMapper) {
    return c.stream().collect(keytoIdentity(keyMapper));
  }

  @Test
  public void keytoIdentityTest() {
    List<Class<?>> classes = Arrays.asList(String.class, ArrayList.class);

    Map<String, Class<?>> nameMap = classes.stream()
        .filter(c -> c.getName().contains("java.lang"))
        .collect(keytoIdentity(c -> c.getSimpleName()));
    assertEquals(String.class, nameMap.get("String"));

    Map<String, Class<?>> nameMap2 = keytoIdentity(classes, c -> c.getSimpleName());
    assertEquals(ArrayList.class, nameMap2.get("ArrayList"));
  }

  @Test
  public void identityToValueTest() {
    List<String> files = Arrays.asList("index.html", "about.html");

    Map<String, byte[]> fileCache = files.stream()
        .filter(f -> f.contains("index"))
        .collect(identityToValue(f -> loadFile(f)));
    assertEquals("index.html", new String(fileCache.get("index.html")));

    Map<String, byte[]> fileCache2 = identityToValue(files, this::loadFile);
    assertEquals("about.html", new String(fileCache2.get("about.html")));
  }

  public byte[] loadFile(String name) {
    // Returns a dummy value for the sake of the test.
    return name.getBytes();
  }
}
Object construction through reflection
In the last post I ranted about dependency injection framework magic, but even custom magic can cause problems. When objects are constructed and invoked through reflection, the execution flow is no longer apparent in the code. Yet, it still has its place in certain applications, typically mapping external input to object instances, be it language parsing or lexing, or DB output to object mapping. But how to best balance between the abstract world of reflected classes and concrete type-safe code?
The key lies in simplicity, and imposing certain constrains. Dynamically resolving classes and recursive reflective construction of a full object a hierarchy is probably not a good idea. Furthermore, as discussed previously, Java 8 method references now makes it cleaner to pass in factory methods, and avoid the Factory Factory Factory trap.
The following snippet shows the reflective construction of an object, given a few constraints: First off, the name of the input token can be mapped to typed classes. In this example that is done with a generated String to Class map, based on the concrete class references we’re dealing with. They have to be available at compile time, and at the time of writing the code. The advantage is that we avoid the Class.forName() look-up, and the package hierarchy confusion and possible mismatch of tokens and classes. If this is too strict, we can modify the map, e.g. by allowing for case-insensitive matching (by converting both map key and look-up to the same case). Or if there is not a literal mapping, an enum could define the relationship. Either way, the idea is that the code make it clear which classes we plan to deal with, in strongly typed manner.
The next assumption in this example is that the class to be created has only one constructor method, and that it is public. Or if that is not feasible, the constructor to be used could be marked with an Annotation. Just don’t go full-on Guice, and you’ll be fine.
Finally, we assume that the relevant constructor takes zero or more parameters, and if it does have parameters that they can themselves we represented and created from a single String object. These parameter objects are initialized in a helper method, discussed below.
  List<Class<?>> validClasses = Arrays.asList(Foo.class, Account.class);

  Map<String, Class<?>> classNameMap = validClasses.stream()
      .collect(Collectors.toMap(c -> c.getSimpleName(), Function.identity()));

  Object construct(String type, String... args) throws Exception {
    if (!classNameMap.containsKey(type)) {
      throw new IllegalArgumentException("Invalid class name: " + type);
    }

    Class<?> klass = classNameMap.get(type);
    Constructor<?>[] constructors = klass.getConstructors();
    Constructor<?> constructor = constructors[0];

    Class<?>[] parameterTypes = constructor.getParameterTypes();
    Object[] parameters = createParameters(parameterTypes, args);
    return constructor.newInstance(parameters);
  }
The construction of the parameter classes also contains several assumptions and restrictions. As with the first order classes, we limit ourselves to a pre-defined set of classes. This make it possible to define which constructor or factory methods should be used. In this example, the constructor which takes a single String is used, except for the Password class, where a factory method is used, again taking a single String.
  Map<Class<?>, Function<String, ?>> classConstructorMap = new HashMap<Class<?>, Function<String, ?>>() { {
    put(String.class, String::new);
    put(Integer.TYPE, Integer::new);
    put(Double.class, Double::new);
    put(Email.class, Email::new);
    put(Password.class, Password::hash);
  } };

  Object[] createParameters(Class<?>[] types, String[] args) {
    if (types.length != args.length) {
      throw new IllegalArgumentException("Expects: " + Arrays.asList(types));
    }

    Object[] result = new Object[types.length];
    for (int i = 0; i < types.length; i++) {
      Class<?> klass = types[i];
      Function<String, ?> constuctor = classConstructorMap.get(klass);
      if (constuctor == null) {
        throw new IllegalArgumentException("Constructor for " + klass + " not declared.");
      }
      result[i] = constuctor.apply(args[i]);
    }
    return result;
  }
That is all it takes to construct objects through reflection, including its parameter types. The examples above maintain some type-safety, and also restricts the supported types. Finally, some error handling and messaging is in place, and more could be added to make it very clear which classes and input is allowed.
The full code listing below shows the example classes to be constructed and test code to verify them.
/* Copyright rememberjava.com. Licensed under GPL 3. See http://rememberjava.com/license */
package com.rememberjava.reflect;

import static org.junit.Assert.assertEquals;

import java.lang.reflect.Constructor;
import java.security.MessageDigest;
import java.security.NoSuchAlgorithmException;
import java.util.Arrays;
import java.util.Base64;
import java.util.HashMap;
import java.util.List;
import java.util.Map;
import java.util.function.Function;
import java.util.stream.Collectors;

import org.junit.Test;

public class ObjectConstructorTest {

  static class Foo {
    final String str;
    final int i;
    final double d;

    public Foo(String str, int i, Double d) {
      this.str = str;
      this.i = i;
      this.d = d;
    }
  }

  static class Account {
    final Email email;
    final Password password;

    public Account(Email email, Password password) {
      this.email = email;
      this.password = password;
    }
  }

  static class Email {
    final String email;

    Email(String email) {
      this.email = email;
    }
  }

  static class Password {
    final String hash;

    Password(String hash) {
      this.hash = hash;
    }

    static Password hash(String pw) {
      try {
        MessageDigest digest = MessageDigest.getInstance("SHA");
        digest.update(pw.getBytes());
        digest.update("some salt".getBytes());

        String base64 = Base64.getEncoder().encodeToString(digest.digest());

        return new Password(base64);
      } catch (NoSuchAlgorithmException e) {
        e.printStackTrace();
      }
      return null;
    }
  }

  List<Class<?>> validClasses = Arrays.asList(Foo.class, Account.class);

  Map<String, Class<?>> classNameMap = validClasses.stream()
      .collect(Collectors.toMap(c -> c.getSimpleName(), Function.identity()));

  Object construct(String type, String... args) throws Exception {
    if (!classNameMap.containsKey(type)) {
      throw new IllegalArgumentException("Invalid class name: " + type);
    }

    Class<?> klass = classNameMap.get(type);
    Constructor<?>[] constructors = klass.getConstructors();
    Constructor<?> constructor = constructors[0];

    Class<?>[] parameterTypes = constructor.getParameterTypes();
    Object[] parameters = createParameters(parameterTypes, args);
    return constructor.newInstance(parameters);
  }

    //@SuppressWarnings("serial")
  @SuppressWarnings("DoubleBraceInitialization")
  Map<Class<?>, Function<String, ?>> classConstructorMap = new HashMap<Class<?>, Function<String, ?>>() { {
    put(String.class, String::new);
    put(Integer.TYPE, Integer::new);
    put(Double.class, Double::new);
    put(Email.class, Email::new);
    put(Password.class, Password::hash);
  } };

  Object[] createParameters(Class<?>[] types, String[] args) {
    if (types.length != args.length) {
      throw new IllegalArgumentException("Expects: " + Arrays.asList(types));
    }

    Object[] result = new Object[types.length];
    for (int i = 0; i < types.length; i++) {
      Class<?> klass = types[i];
      Function<String, ?> constuctor = classConstructorMap.get(klass);
      if (constuctor == null) {
        throw new IllegalArgumentException("Constructor for " + klass + " not declared.");
      }
      result[i] = constuctor.apply(args[i]);
    }
    return result;
  }

  @Test
  public void testFoo() throws Exception {
    Foo foo = (Foo) construct("Foo", "ABC", "123", "3.14");
    assertEquals("ABC", foo.str);
    assertEquals(123, foo.i);
    assertEquals(3.14, foo.d, 2);
  }

  @Test
  public void testAccount() throws Exception {
    Account account = (Account) construct("Account", "bob@example.com", "some password");
    assertEquals("V0PYfuPn4u9Gize+0DZ0nLgQQPk=", account.password.hash);
  }

  @Test(expected = IllegalArgumentException.class)
  public void testUndefinedClass() throws Exception {
    construct("NotFound");
  }

  @Test(expected = NumberFormatException.class)
  public void testInvalidParameterType() throws Exception {
    construct("Foo", "ABC", "ABC", "3.14");
  }

  @Test(expected = IllegalArgumentException.class)
  public void testInvalidParameterCount() throws Exception {
    construct("Foo", "ABC");
  }
}
WebSocket Chat example with the SimpleFramework API
As mentioned in the previous post, the SimpleFramework API and server is a minimal alternative in the world of Java application servers like Glassfish, Tomcat. Hosted on GitHub under an Apache v2.0 license, they offer an embeddable HTTP, Servlet and WebSocket capable stack and API. They claim their performance is better than other Java based web servers.
The Dependency Injection Framework Trap
Whether they live up to their name, and is truly easy and simple to use is somewhat debatable, though. They favour Spring for dependency injection, which means part of the code is specified in XML, and is “magically” coupled during runtime. There might be benefits to that, but the downside is that it becomes difficult to read and debug. In fact, their demo application will not start for whatever reason, and all that is offered in terms of output is an InvalidArgumentException without further details deep down from the Spring code.
Don’t get me wrong, the Google Guice framework is not much better. It might specify its module coupling in Java code instead of XML, however, when it comes to following the code and debugging, it is just as obscure. Implementations tend to be hidden behind layers of interfaces. As for the promise of easily re-wireable code, they both fall short. When it comes down to it, a refactoring will typically involve changes in both class content and class relationships, so a dependency injection framework is more likely to get in the way than help.
Finally, when it comes to testability, dependency injection is of course crucial. Being able to inject mocks or other testing objects keeps unit tests small. However, a wiring framework is not needed to describe the class relationships. In fact, my personal experience is that Guice based code is more cumbersome to use in test related code. It takes considerable effort to track down which classes to include in a unit test, and which to leave out, and then to create a test module of it all. At least Spring leaves the class constructors intact and simple.
Making it work
So, with that rant out of the way, what does it take to make the Simple Framework WebSocket Chat Demo work? My solution was to simply shortcut the 114 line XML Spring configuration, and write the same class relations in Java. The following 20 lines achieves the same as the XML.
Furthermore, it’s worth noting that the SimpleFramework is structured in multiple Maven projects, with dependencies between each other, as seen below the code snippet. It highlights another potential problem with the project. A lot of the server code required to make the Chat demo run is in another demo package. It suggest quite a lot of custom code has to be written to use the server API.
  public static void main(String[] args) throws Exception {
    new LogConfigurer(new File("etc/log4j.xml")).configure();

    Map<String, String> content = new HashMap<>();
    content.put(".*", "text/html");
    ContentTypeResolver typeResolver = new ContentTypeResolver(content);
    FileManager manager = new FileManager(new File("data/chat"));
    FileResolver fileResolver = new FileResolver(manager, "index.html", "index.html");
    Resource fileSystemResource = new FileSystemResource(fileResolver, typeResolver);
    Resource chatRoomLogin = new ChatRoomLogin(fileSystemResource);
    Service chatRoom = new ChatRoom();
    StringResource failureResource = new StringResource("An error occured serving a resource!",
        "text/plain; charset=UTF-8", "UTF-8", Status.INTERNAL_SERVER_ERROR);
    Resource notFoundResource = new StringResource("Resource could not be found!!", "text/plain; charset=UTF-8",
        "UTF-8", Status.NOT_FOUND);
    Map<String, Resource> resources = new HashMap<>();
    resources.put("/login.html", chatRoomLogin);
    ResourceEngine resourceEngine = new RegularExpressionEngine(resources, notFoundResource);
    ResourceContainer resourceContainer = new ResourceContainer(resourceEngine, failureResource);
    TraceAnalyzer analyzer = new LogAnalyzer();
    Container webContainer = new WebContainer(resourceContainer, "Chat/1.0");
    Router webSocketRouter = new DirectRouter(chatRoom);
    Container webSocketContainer = new RouterContainer(webContainer, webSocketRouter, 2);
    WebServer server = new WebServer(webSocketContainer, analyzer, PORT);

    server.start();
  }
The GitHub Maven packages and dependencies at the time of writing:
simple (core code)
simple-test (unit tests) -> “simple”
simple-demo (common demo code) -> “simple”
simple-demo-chat -> “simple”, “simple-demo”
simple-demo-graph -> “simple”, “simple-demo”
simple-demo-rest -> “simple”, “simple-demo”, “simple-demo-chat”
It is not entirely clear whether the last demo example, “simple-demo-rest”, depends on the “simple-chat” project as the XML suggests, or whether the duplicate ChatRoom class was intended to be used. It might be that the XML was copied, but not updated - highlighting the previous point about hard to maintain and read dependency injection code.
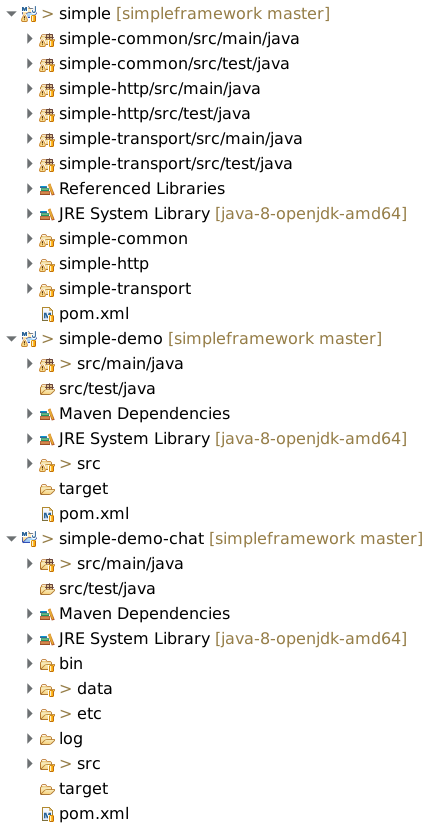
Focusing only on the “simple-demo-chat” example then, this would be what it could look like in the Eclipse Package Explorer, with each directory created as a separate Java project.
Finally, here’s the full main-file hack to make the chat example work. Notice the required helper classes from demo packages.
/* Copyright rememberjava.com. Licensed under GPL 3. See http://rememberjava.com/license */
package com.rememberjava.http;

import java.io.File;
import java.util.HashMap;
import java.util.Map;

import org.simpleframework.demo.http.WebContainer;
import org.simpleframework.demo.http.WebServer;
import org.simpleframework.demo.http.resource.ContentTypeResolver;
import org.simpleframework.demo.http.resource.FileSystemResource;
import org.simpleframework.demo.http.resource.RegularExpressionEngine;
import org.simpleframework.demo.http.resource.Resource;
import org.simpleframework.demo.http.resource.ResourceContainer;
import org.simpleframework.demo.http.resource.ResourceEngine;
import org.simpleframework.demo.http.resource.StringResource;
import org.simpleframework.demo.io.FileManager;
import org.simpleframework.demo.io.FileResolver;
import org.simpleframework.demo.log4j.LogConfigurer;
import org.simpleframework.demo.trace.LogAnalyzer;
import org.simpleframework.http.Status;
import org.simpleframework.http.core.Container;
import org.simpleframework.http.socket.service.DirectRouter;
import org.simpleframework.http.socket.service.Router;
import org.simpleframework.http.socket.service.RouterContainer;
import org.simpleframework.http.socket.service.Service;
import org.simpleframework.transport.trace.TraceAnalyzer;

public class SfChatDemoMain {

  private static final int PORT = 6060;

  public static void main(String[] args) throws Exception {
    new LogConfigurer(new File("etc/log4j.xml")).configure();

    Map<String, String> content = new HashMap<>();
    content.put(".*", "text/html");
    ContentTypeResolver typeResolver = new ContentTypeResolver(content);
    FileManager manager = new FileManager(new File("data/chat"));
    FileResolver fileResolver = new FileResolver(manager, "index.html", "index.html");
    Resource fileSystemResource = new FileSystemResource(fileResolver, typeResolver);
    Resource chatRoomLogin = new ChatRoomLogin(fileSystemResource);
    Service chatRoom = new ChatRoom();
    StringResource failureResource = new StringResource("An error occured serving a resource!",
        "text/plain; charset=UTF-8", "UTF-8", Status.INTERNAL_SERVER_ERROR);
    Resource notFoundResource = new StringResource("Resource could not be found!!", "text/plain; charset=UTF-8",
        "UTF-8", Status.NOT_FOUND);
    Map<String, Resource> resources = new HashMap<>();
    resources.put("/login.html", chatRoomLogin);
    ResourceEngine resourceEngine = new RegularExpressionEngine(resources, notFoundResource);
    ResourceContainer resourceContainer = new ResourceContainer(resourceEngine, failureResource);
    TraceAnalyzer analyzer = new LogAnalyzer();
    Container webContainer = new WebContainer(resourceContainer, "Chat/1.0");
    Router webSocketRouter = new DirectRouter(chatRoom);
    Container webSocketContainer = new RouterContainer(webContainer, webSocketRouter, 2);
    WebServer server = new WebServer(webSocketContainer, analyzer, PORT);

    server.start();
  }
}
A failed attempt at a WebSocket server
Following the post about the small HTTP server using the the com.sun.net.httpserver API, I thought I’d try to make it work with WebSockets. I’ll save the suspense; it wont work. And I’m not the first to have failed at it, but it’s always more fun to search for the solution afterwards..
The problem is that the httpserver package is not designed for the persistent bi-directional connection used by the WebSocket protocol. The only part which will work is the handshake, which transmits a HTTP like request and response. However, as soon as that response is sent, the connection is closed, and thus the WebSocket object in the browser client will close.
There is a WebSocket API in Java EE, however it will require an application server like Glassfish or Tomcat to run. Another option is the SimpleFramework server, which also includes a WebSocket implementation. More about that in a later post.
The only part of the code worth mentioning here is the handshake response from the server. It sets the correct headers and encodes the server accept key according to the specification. Connecting to this server will therefore result in a valid websocket object on the client, as long as handle() method on the server does not return.
  public void handle(HttpExchange ex) throws IOException {
    Headers reqHeaders = ex.getRequestHeaders();
    reqHeaders.entrySet().forEach(System.out::println);

    String serverResponseKey = getServerResponseKey(reqHeaders.get("Sec-websocket-key").get(0));

    Headers resHeaders = ex.getResponseHeaders();
    resHeaders.add("Sec-WebSocket-Accept", serverResponseKey);
    resHeaders.add("Upgrade", "websocket");
    resHeaders.add("Connection", "Upgrade");

    ex.sendResponseHeaders(101, -1);

    // When time is up, the connection will be closed, and the browser object
    // will get a call to onClose() on the websocket object.
    sleep(5000);
  }

  private String getServerResponseKey(String clientKey) {
    try {
      MessageDigest digest = MessageDigest.getInstance("SHA-1");
      digest.update(clientKey.getBytes());
      digest.update(WEB_SOCKET_GUID.getBytes());
      byte[] sha1 = digest.digest();

      return Base64.getEncoder().encodeToString(sha1);

    } catch (NoSuchAlgorithmException e) {
      e.printStackTrace();
    }

    return null;
  }
Hello World with JavaFx
JavaFx is a comprehensive platform and set of APIs to develop desktop, web and even mobile applications. Although intended to replace the Swing GUI API, it can get significantly more complex, with FXML for XML based object specification; CSS styling; and special IDE tool chains.
Since JDK 8, it is supposedly included in the main install, however, on Debian I had to install it separately:
apt-get install openjfx openjfx-sourceThe Oracle documentation and tutorial is detailed and well written, so I will not go into further detail here. The following is a simple Hello World app.
/* Copyright rememberjava.com. Licensed under GPL 3. See http://rememberjava.com/license */
package com.rememberjava.ui;

import javafx.application.Application;
import javafx.collections.ObservableList;
import javafx.scene.Node;
import javafx.scene.Scene;
import javafx.scene.control.Button;
import javafx.scene.control.Label;
import javafx.scene.layout.VBox;
import javafx.stage.Stage;

@SuppressWarnings("restriction")
public class JavaFxHelloWorld extends Application {

  public static void main(String[] args) {
    launch(args);
  }

  @Override
  public void start(Stage primaryStage) {
    primaryStage.setTitle("My App");

    Label label = new Label();

    Button button = new Button();
    button.setText("Say 'Hello World'");
    button.setOnAction((e) -> {
      label.setText("Hi!");
    });

    VBox root = new VBox();
    ObservableList<Node> children = root.getChildren();
    children.add(button);
    children.add(label);

    primaryStage.setScene(new Scene(root));
    primaryStage.show();
  }
}
Terminal and ncurses Java libraries
There’s a few Java libraries for creating terminal and ncurses like applications. They abstract away the ANSI escape codes and low level control like tput. I’ve briefly looked at three of them: Lanterna, Charva and JCurses. They all come with basic terminal control, and some widgets and window managing to create terminal based GUI applications.
JCurses seems to be the oldest, and possibly unmaintained. It requires ncurses to be installed, and also a native library. It is available through the Maven Central repository, however, make sure to set up the path for access to the libjcurses.so (in the tar-ball from SourceForge, or within the .jar from Maven). Documentation is sparse, but it seems it’s possible to interface with the terminal with little code.
Charva is also ncurses based and requires a native lib. One of it’s selling points is that it can act as a drop-in replacement for java.awt UIs. It seems unlikely that that will work well for all but the simplest UIs, however, at least it offers an easy transition path.
Finally, Lanterna seems to be the best maintained, and clearly documented project of the three. It is unique in that is handles all terminal details itself, and does not require external libraries. It is compatible with Linux, Windows, Cygwin, OS X terminals. Furthermore, if launched from an X or similar GUI based environment instead of a terminal, it will create its own GUI window into which it will render the terminal. Neat.
The drawback with Lanterna is its rather verbose and involved API. For “serious” apps, maybe that’s OK, but for simple positioning of the cursor, it can get a bit too much. The follow renders a text label with a border:
  public void testWindow() throws IOException, InterruptedException {
    Terminal terminal = new DefaultTerminalFactory().createTerminal();
    Screen screen = new TerminalScreen(terminal);
    screen.startScreen();

    Label label = new Label("test");

    BasicWindow window = new BasicWindow();
    window.setComponent(label);

    MultiWindowTextGUI gui = new MultiWindowTextGUI(screen, new DefaultWindowManager(),
        new EmptySpace(TextColor.ANSI.BLACK));
    gui.setTheme(LanternaThemes.getRegisteredTheme("businessmachine"));
    gui.addWindowAndWait(window);
  }
Lanterna is available through Maven Central, so the following gradle.build lines will do.
repositories {
  mavenCentral()
}

dependencies {
  compile 'com.googlecode.lanterna:lanterna:3.0.0-beta3'
}
Here’s the full test example, including a main-method to easily run it stand-alone from the terminal.
/* Copyright rememberjava.com. Licensed under GPL 3. See http://rememberjava.com/license */
package com.rememberjava.ui;

import java.io.IOException;

import org.junit.Test;

import com.googlecode.lanterna.TextColor;
import com.googlecode.lanterna.bundle.LanternaThemes;
import com.googlecode.lanterna.gui2.BasicWindow;
import com.googlecode.lanterna.gui2.DefaultWindowManager;
import com.googlecode.lanterna.gui2.EmptySpace;
import com.googlecode.lanterna.gui2.Label;
import com.googlecode.lanterna.gui2.MultiWindowTextGUI;
import com.googlecode.lanterna.screen.Screen;
import com.googlecode.lanterna.screen.TerminalScreen;
import com.googlecode.lanterna.terminal.DefaultTerminalFactory;
import com.googlecode.lanterna.terminal.Terminal;

public class LanternaCliTest {

  public static void main(String[] args) throws Exception {
    new LanternaCliTest().testWindow();
  }

  @Test
  public void testWindow() throws IOException, InterruptedException {
    Terminal terminal = new DefaultTerminalFactory().createTerminal();
    Screen screen = new TerminalScreen(terminal);
    screen.startScreen();

    Label label = new Label("test");

    BasicWindow window = new BasicWindow();
    window.setComponent(label);

    MultiWindowTextGUI gui = new MultiWindowTextGUI(screen, new DefaultWindowManager(),
        new EmptySpace(TextColor.ANSI.BLACK));
    gui.setTheme(LanternaThemes.getRegisteredTheme("businessmachine"));
    gui.addWindowAndWait(window);
  }
}
A simple HTTP server
The unofficial com.sun packages which is still part of the main JDK, include a few convenience classes for running a HTTP server. However, since these are not part of the official API, there’s typically a warning in the IDEs not to use them. The annotation @SuppressWarnings(“restriction”) can also be used to ignore this warning. Besides that, they will work fine.
Here’s what it takes to start the server on a given port, and serve static files from a specific directory tree:
  void start() throws IOException {
    server = HttpServer.create(new InetSocketAddress(PORT), 0);

    server.createContext("/static", new StaticFileHandler(BASEDIR));

    server.start();
  }
The second argument to the create() method, which is currently 0, is the number of queued incoming queries. Setting a higher number here will allow the server to handle more parallel incoming requests, however potentially at the expense of overall throughput.
The start() is non-blocking, so a typically server application would have to go into an internal loop.
As for the handler, it listens to requests where the path of the URI starts with the specified string, in this case “/static”. It can then use the request URI to map this to hard-coded files, or files with the same name as in this example:
  public void handle(HttpExchange ex) throws IOException {
    URI uri = ex.getRequestURI();
    String name = new File(uri.getPath()).getName();
    File path = new File(baseDir, name);

    Headers h = ex.getResponseHeaders();
    // Could be more clever about the content type based on the filename here.
    h.add("Content-Type", "text/html");

    OutputStream out = ex.getResponseBody();

    if (path.exists()) {
      ex.sendResponseHeaders(200, path.length());
      out.write(Files.readAllBytes(path.toPath()));
    } else {
      System.err.println("File not found: " + path.getAbsolutePath());

      ex.sendResponseHeaders(404, 0);
      out.write("404 File not found.".getBytes());
    }

    out.close();
  }
Finally, to test the running server, here’s two unit tests. The first downloads a file which exists, and prints its lines. The second requests a file which does not exist. Notice that the 404 return code passed from sendResponseHeaders() in the handler, is enough to make the openStream() call throw a FileNotFoundException on the client side.
  //@Test
  public void disabled_testDownload() throws IOException {
    server.start();

    URL url = new URL("http://localhost:9999/static/test.txt");
    BufferedReader in = new BufferedReader(new InputStreamReader(url.openStream()));
    in.lines().forEach(System.out::println);
    in.close();
  }

  @Test(expected = FileNotFoundException.class)
  public void testFilenNotFound() throws IOException {
    server.start();

    URL url = new URL("http://localhost:9999/static/not_found");
    url.openStream();
  }
Here’s the main class:
/* Copyright rememberjava.com. Licensed under GPL 3. See http://rememberjava.com/license */
package com.rememberjava.http;

import java.io.IOException;
import java.net.InetSocketAddress;

import com.sun.net.httpserver.HttpServer;

@SuppressWarnings("restriction")
public class SimpleHttpServer {

  private static final String BASEDIR = "com/rememberjava/http";

  private static final int PORT = 9999;

  private HttpServer server;

  public static void main(String[] args) throws Exception {
    SimpleHttpServer server = new SimpleHttpServer();
    server.start();
  }

  void start() throws IOException {
    server = HttpServer.create(new InetSocketAddress(PORT), 0);

    server.createContext("/static", new StaticFileHandler(BASEDIR));

    server.start();
  }

  public void stop() {
    server.stop(0);
  }
}
And here’s the Handler for static files:
/* Copyright rememberjava.com. Licensed under GPL 3. See http://rememberjava.com/license */
package com.rememberjava.http;

import java.io.File;
import java.io.IOException;
import java.io.OutputStream;
import java.net.URI;
import java.nio.file.Files;

import com.sun.net.httpserver.Headers;
import com.sun.net.httpserver.HttpExchange;
import com.sun.net.httpserver.HttpHandler;

@SuppressWarnings("restriction")
public class StaticFileHandler implements HttpHandler {

  private final String baseDir;

  public StaticFileHandler(String baseDir) {
    this.baseDir = baseDir;
  }

  @Override
  public void handle(HttpExchange ex) throws IOException {
    URI uri = ex.getRequestURI();
    String name = new File(uri.getPath()).getName();
    File path = new File(baseDir, name);

    Headers h = ex.getResponseHeaders();
    // Could be more clever about the content type based on the filename here.
    h.add("Content-Type", "text/html");

    OutputStream out = ex.getResponseBody();

    if (path.exists()) {
      ex.sendResponseHeaders(200, path.length());
      out.write(Files.readAllBytes(path.toPath()));
    } else {
      System.err.println("File not found: " + path.getAbsolutePath());

      ex.sendResponseHeaders(404, 0);
      out.write("404 File not found.".getBytes());
    }

    out.close();
  }

}